How to Check Engine Compression on a 2006 Dodge Sprinter Van
Ensuring your engine’s compression is within the recommended range is crucial for maintaining performance and preventing engine damage. Follow these steps to check the compression on your 2006 Dodge Sprinter van.
Tools and Equipment You’ll Need:
- Compression gauge
- Ratchet and socket set
- Spark plug socket
- Torque wrench (optional)
- Pen and paper for recording results
- Safety gloves and eye protection
Step-by-Step Guide:
1. Preparation
- Park the Van Safely: Ensure the van is parked on a flat surface and the engine is completely cool.
- Disconnect the Battery: For safety, disconnect the negative terminal of the battery to avoid any accidental starts.
- Remove Engine Covers: If necessary, remove any plastic engine covers that obstruct access to the injectors or glow plugs.
2. Locate and Remove Glow Plugs or Fuel Injectors
- Identify the Location: On the 2006 Dodge Sprinter, the glow plugs or fuel injectors are located on the cylinder head. You will need to remove them to insert the compression gauge.
- Remove the Glow Plugs/Injectors: Using a socket wrench, carefully remove the glow plugs or injectors from each cylinder. Label the plugs or injectors if needed to ensure proper reinstallation later.
3. Install the Compression Gauge
- Attach the Compression Tester: Connect the compression tester to the first cylinder by screwing it into the glow plug or injector hole. Ensure it is securely in place to get an accurate reading.
4. Crank the Engine
- Reconnect the Battery: Once the gauge is securely attached, reconnect the battery.
- Disable the Fuel System: To prevent the engine from actually starting during the test, disable the fuel system by removing the fuel pump relay or unplugging the injectors.
- Crank the Engine: Have an assistant turn the key and crank the engine for about 5–10 seconds. Observe the gauge and record the highest reading for that cylinder.
5. Repeat for All Cylinders
- Move to the Next Cylinder: Repeat the process for each cylinder, ensuring the gauge is securely attached each time. Record the compression readings for each one.
6. Compare Results
- Check Against Manufacturer Specifications: The compression readings for the 2006 Dodge Sprinter should be within a specific range, typically around 350-450 PSI. If one or more cylinders show significantly lower readings, it may indicate engine issues like worn piston rings, valve problems, or a head gasket leak.
- Look for Consistency: Variations of more than 10-15% between cylinders may signal a problem that needs further investigation.
7. Reassemble the Engine
- Reinstall Glow Plugs/Injectors: After completing the test, reinstall the glow plugs or injectors, ensuring they are tightened to the correct torque specifications.
- Reconnect Any Disconnected Components: Reattach any engine covers and reconnect any other components removed for access.
8. Reconnect the Battery
- Reconnect the Negative Terminal: Once everything is reassembled, reconnect the negative terminal of the battery.
Important Tips:
- Wear Protective Gear: Always wear gloves and safety glasses to protect yourself from engine debris or accidental injuries.
- Use Quality Tools: Ensure you’re using a high-quality compression gauge to get accurate readings.
- Check the Manual: Always consult your Dodge Sprinter owner’s manual for specific engine details and torque specifications.
By following these steps, you can accurately check the compression of your Dodge Sprinter van’s engine and diagnose potential issues early. If the compression is lower than expected, it’s recommended to consult a professional mechanic for further diagnosis and repair.
Another Procedure to do the compression test
Compression Check: Testing and Inspection
STANDARD PROCEDURE – COMPRESSION TESTING ENGINE
COMPRESSION SPECIFICATIONS
1. Warm up your T1N 2.7L Diesel Engine to operating temperature (approximately 80°C, 176°F).
2. Shut off Sprinter van engine.
3. Remove Sprinter van engine cover.
4. Remove 2.7L Sprinter glow plugs.
5. Crank engine several times with the starter to eliminate combustion residues in the cylinders.
6. Insert compression tester adapter # 8927 with check valve installed into glow plug hole of cylinder to be tested.
7. Connect compression tester hose adapter # 9295 to compression gauge and test compression pressure by cranking engine with starter for at least 8
revolutions.
8. Perform test procedure at the remaining cylinders in the same manner as you did the first.
9. Compare pressure readings obtained with the specified pressures. If the pressure reading is below the minimum compression pressure or if the
permissible difference between the individual cylinders is exceeded. Refer to cylinder leak down test. See: Testing and Inspection/Cylinder Leak
Down Test
10. Remove T1N Sprinter compression tester and adapter from cylinder head.
11. Install glow plugs.
12. Install engine cover.
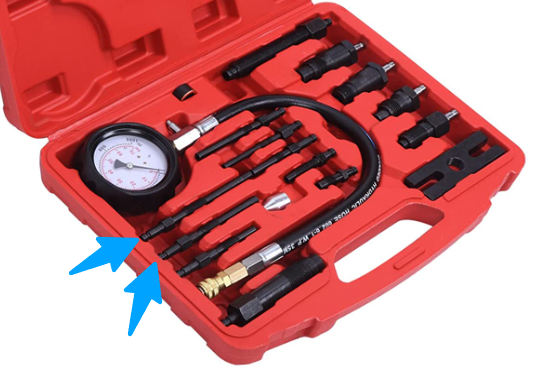
Procedure for using T1N 2001-2006 Sprinter Van 2.7L Diesel Cylinder 1000 Psi Compression Tool Kit
Equipment Required:
–
Diesel Cylinder 1000 Psi Compression Tool Kit Click Here

–
