Description
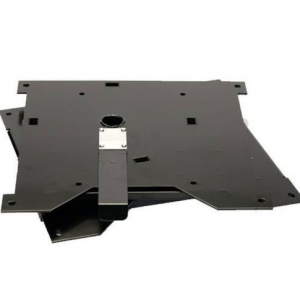
Sprinter Van Seat Swivel, hand brake relocation adapter for a 2001-2006 Sprinter Van
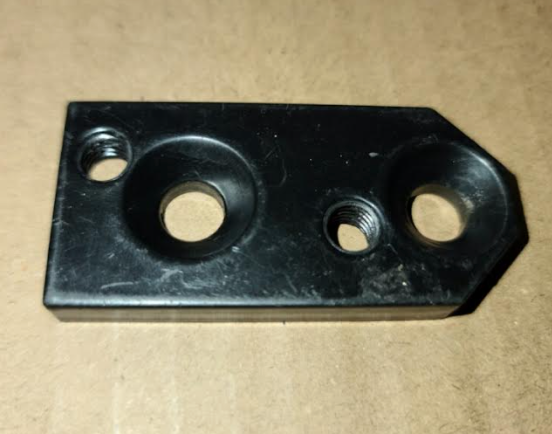
Sprinter Van Handbrake Relocation Bracket – 2001–2006 T1N (Driver Side Seat Swivel Compatibility)
Upgrade your van layout with a handbrake relocation adapter specifically designed to work with driver-side seat swivels on 2001–2006 Sprinter Vans (T1N chassis). This bracket lowers and repositions the handbrake assembly to allow full swivel range without interference — a must-have for any functional camper or mobile workspace build.
Whether you’re installing a new swivel base or enhancing comfort and usability in your existing conversion, this relocation kit ensures smooth rotation and clean clearance for your driver seat.
🔧 Key Features:
-
Designed for T1N Sprinters: Engineered to fit 2001–2006 Sprinter Vans with factory or aftermarket seat swivels.
-
Swivel-Compatible: Allows the driver seat to rotate freely without hitting the handbrake lever.
-
Durable Construction: CNC-cut steel bracket with corrosion-resistant finish for strength and longevity.
-
Bolt-On Installation: Includes mounting hardware for quick and easy install — no welding or cutting required.
-
Essential for Swivel Installs: Ensures proper ergonomic clearance and prevents handbrake lever damage.
📐 Specifications:
-
Fits: 2001–2006 Sprinter Van (T1N)
-
Material: Hardened steel
-
Includes: Relocation bracket, hardware, and install instructions
-
Compatibility: Works with most seat swivel bases on the market
Note: Required for proper swivel seat operation on the driver side of T1N Sprinters. Passenger side does not require this bracket.
Handbrake Relocation Bracket Installation – 2001–2006 Sprinter (T1N)
Step 1: Remove the Handbrake Assembly
-
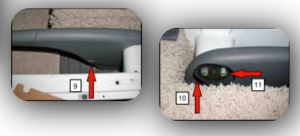
Using a 13mm socket or wrench, remove the two factory mounting bolts (shown as item #11 in the reference image).
-
Carefully remove the handbrake cover.
-
Trim the cover as needed:
-
For View/Navion models, follow the cut shown in Figure 12.
-
For standard passenger or cargo vans, a small trim (approx. 1 inch) is typically sufficient to clear the fire extinguisher bracket.
-
-
-
Reinstall the handbrake cover onto the handbrake assembly once trimming is complete.
Step 2: Install the Relocation Bracket
-
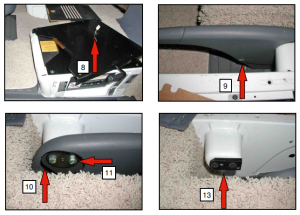
Using a 5mm Allen wrench or socket, install the two taper-head bolts and the relocation bracket (see Figure 13).
-
The tapered end of the bracket should face the rear of the vehicle.
-
If bolt holes do not line up with the factory threads, you may need to drill out the tapered holes on the relocation bracket.
-
-
Reinstall the handbrake assembly onto the relocation bracket using the original 13mm bolts.
-
Note: If the bolts bottom out, add a washer spacer to prevent overtightening.
-
Be cautious to avoid cross-threading. If bolts won’t thread cleanly, remove the assembly and die grind the mounting holes as needed.
-
-
Reinstall the brake cable pin and access cover.
Step 3: Adjust the Handbrake Cables
-
After repositioning the handbrake assembly, the cables will require adjustment. Start by releasing the handbrake.
-
Locate the handbrake adjustment assembly underneath the van, just in front of the rear axle (see Figure 14).
-
Using a 13mm socket and short extension, loosen the four mounting bolts (see Figure 15).
-
Slide the housing rearward (toward the back of the van, Figure 16) and retighten the bolts.
-
To adjust the rear brake cables:
-
Loosen the set bolt with a 13mm socket and short extension (Figure 17).
-
Rotate the cam plate ½” to ¾” clockwise (Figure 18), then tighten the bolt.
-
-
Test the handbrake by engaging and releasing it. Ensure the van rolls freely in neutral with the brake released. Re-adjust if necessary.
Step 4: Modify the Pedestal Cover (if applicable)
-
Remove the pressboard pedestal cover and mark a line 2.87″ from its rear edge.
-
Cut the board in two along the marked line (Figure 7).
-
Place the smaller section across the front portion of the seat pedestal.
-
Proceed to install the swivel base and seat, following passenger-side installation instructions.
-
Be sure to pull the seatbelt wiring connector through the center swivel opening and reconnect it to the seat harness (Figure 8
-


Reviews
There are no reviews yet.